
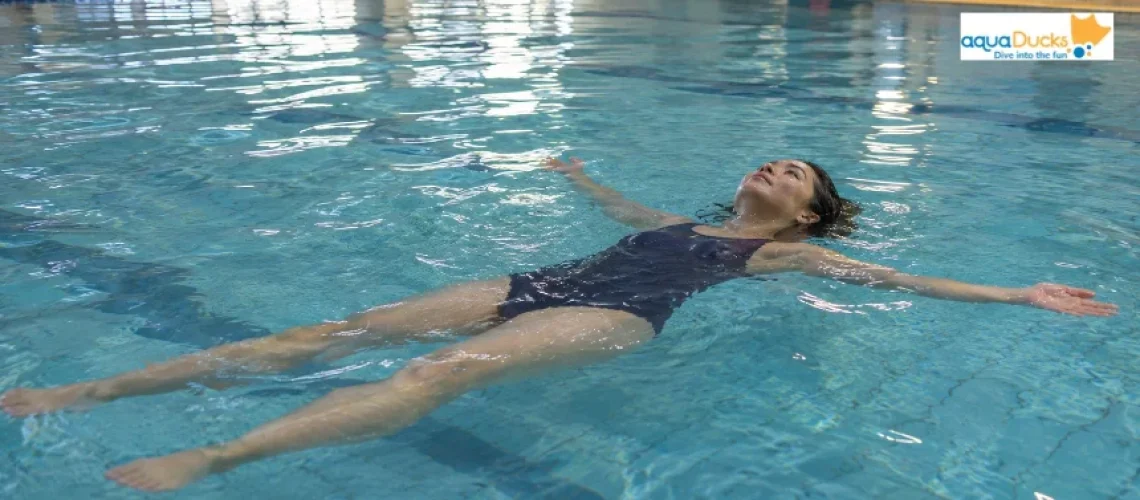
To float on your back, lie back with your ears in the water, look straight up, lift your tummy towards the surface, spread your arms and legs into a loose star and keep your lungs mostly full with slow, shallow breaths. Do those five things and relax, and the water will hold you.
That’s the short answer. The longer one is below, because knowing the steps and actually trusting the water are two different things. This guide is written the way our coaches at AquaDucks teach the back float in the pool: each step in detail, how to breathe, how to stand up again, what to do when your legs sink, a four-week practice plan, and how to teach a child. We’ve been teaching swimmers of every age in Singapore since 1989, and the back float is the skill we start almost everyone on.
What you need before your first back float
You don’t need much, but getting these right makes the first attempt far less stressful.
- The shallow end. Waist- to chest-deep water, where you can put your feet down the moment you want to.
- Someone beside you. A friend, family member or coach within arm’s reach. Never practise floating alone for the first time.
- Warm, calm water. Cold water makes muscles tense and breathing quick, and both work against floating. A heated indoor pool on a quiet weekday is ideal.
- One or two simple aids. A pool noodle and a kickboard are enough. Leave the armbands at home; they hold you upright, which is the opposite of the position you’re trying to learn.
- Optional extras. A nose clip if water up your nose bothers you, and earplugs or a swim cap if you’re prone to ear infections. Goggles aren’t really needed for back floating.
How to float on your back: step by step
Read through all eight steps once before you get in, then try them in order. Don’t worry if it takes several attempts. Almost nobody gets a relaxed back float on the first try.
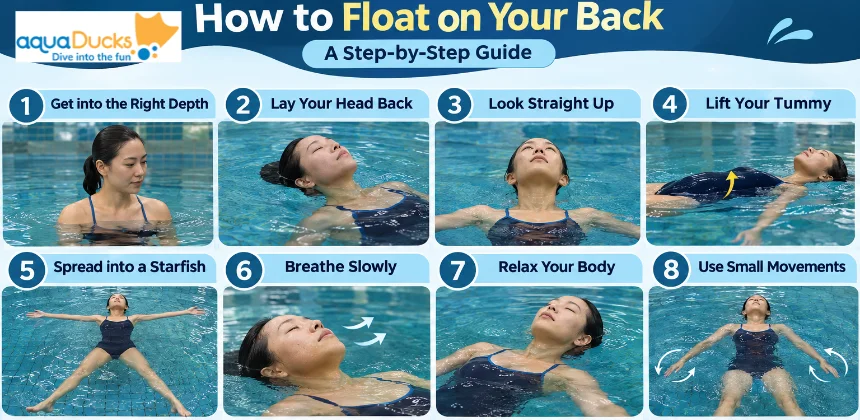
Step 1: Sink down until your shoulders are under
Stand in the shallow end and bend your knees until the water reaches your shoulders. This is the step most beginners skip. They stand tall and then tip backwards, which turns a gentle lean into a fall, and that’s usually when water rushes up the nose. Starting low means you only have to lean back a few centimetres before the water takes your weight.
Step 2: Lay your head back as if on a pillow
Slowly let the back of your head rest on the water. Keep going until your ears are fully under. The waterline should sit around the edge of your face, roughly across your forehead, cheeks and chin, with your nose and mouth clear.
This is the most important step, and the one people resist most. With your ears out, your head is effectively being held up by your neck, and that extra weight above the water pushes your hips and legs down. Once the ears go in, the water supports your head and everything else rises. Sounds will go muffled. Most people find that strange for the first few seconds and calming after that.
Step 3: Look straight up and keep looking
Pick a spot on the ceiling (or a cloud, if you’re outdoors) directly above your face and keep your eyes on it. Your body follows your eyes. Look at your toes and your chin tucks, your hips drop and you start folding in the middle. Look up and your spine stays long.
A tip we give nervous swimmers: if the urge to check what’s happening gets strong, ask your buddy to tell you instead. “Your feet are fine, your hips are up” from someone standing next to you is far better than lifting your head to see.
Step 4: Lift your tummy towards the surface
As you lean back, gently push your belly button upwards, as though someone were sliding a tray under the small of your back. Keep it gentle. You’re not arching like a gymnast, just stopping your bottom from sinking into a sitting position.
Your feet will lift off the floor on their own as your body levels out. Don’t push off the bottom to make it happen. A push sends you backwards and makes you tense, and your feet will drift up anyway.
Step 5: Spread into a starfish
Open your arms out to the sides at about shoulder height, palms facing up, fingers relaxed. Let your legs drift apart to hip-width or a little wider. The bigger your shape, the more stable you’ll feel, because your weight is spread over more water and small wobbles don’t tip you over.
If your legs keep dropping, slide your arms up the water until they’re above your head, beside your ears. Moving weight towards your head end acts like a counterweight and helps the legs rise. Try both positions and see which feels steadier for your body.
Step 6: Breathe to stay high
Take a full breath in and let your lungs stay mostly full. The air in your chest is your built-in buoyancy aid, so the more of it you keep, the higher you’ll sit. Breathe out in short, gentle puffs and top up again before you’re empty. There’s a whole section on breathing below, because it’s where a lot of floats go wrong.
Step 7: Let go of every bit of tension you can find
Tense muscles make you sink. Start at the top and work down: unclench your jaw, drop your shoulders away from your ears, let your hands go soft, relax your stomach once your hips are up, and let your toes go floppy. Wiggle your fingers if you notice them stiffening. Counting slowly to ten in your head gives your mind something to do other than worry.
If your legs sink a little at this point, let them. Fighting it only adds tension. Most people settle at a comfortable angle within a few seconds and stay there.
Step 8: Use tiny movements if you need them
Some bodies, especially lean and muscular ones, sink slowly even with perfect technique. That’s fine. Add a gentle scull with your hands beside your hips, moving them in small figure-of-eight shapes just under the surface. Or add a slow, soft flutter kick from the hips with relaxed ankles. This is still floating. The goal is to stay at the surface with as little effort as possible, not to be a statue.
How to breathe while floating on your back
Breathing is where many floats fall apart, usually because people either hold their breath until they’re desperate or let it all out in one big sigh. Both make you sink.
Here’s the rhythm we teach:
- Breathe in fully through your mouth.
- Pause for a moment with your lungs full.
- Breathe out a small amount, about a quarter of the air, through your mouth or nose.
- Breathe straight back in to top up.
- Repeat at a slow, even pace.
You’ll notice your chest rising slightly on every inhale and dipping on every exhale. That gentle bob is normal and a sign you’re doing it right. If water splashes onto your face, close your mouth, breathe out lightly through your nose and wait for it to pass. Lifting your head to clear your face will only sink your legs and bring more water over you.
If water keeps getting up your nose, try humming very gently through it while you float. The small stream of air keeps water out. A nose clip is a perfectly good shortcut while you’re learning, and plenty of adults use one for months.
How to stand up from a back float
This is the part most beginners worry about, and it’s often the real reason they can’t relax. If you’re not sure you can get back to your feet, part of you will be braced the whole time. So learn the recovery first and practise it until it’s boring.
Method 1: the tuck and sweep
- Bring your chin gently towards your chest and look at your toes.
- Pull your knees up towards your chest, as if you were sitting down into a chair.
- Sweep both arms forward and down through the water. This rolls your body upright.
- Put your feet on the pool floor and stand.
Method 2: the lazy drop
If coordinating all of that feels like too much, simply look at your toes and let your legs sink. Your body swings upright by itself and you can put your feet down. It’s slower but almost impossible to get wrong.
In deeper water
Once you’re comfortable, you’ll want to know what to do if you can’t touch the bottom. Tuck your chin and knees as above, sweep your arms forward to bring yourself upright, and go straight into treading water or roll onto your front to swim to the side. Only practise this with a coach or a confident swimmer next to you.
Do ten recoveries in a row at the start of every practice. Once it’s automatic, you’ll find your floats get longer without you trying.
How to float on your back with support
If going straight to an unsupported float feels like too big a jump, work through these supported versions first. Each one gives you a little less help than the last.
- Holding the wall. Face away from the wall, reach back and hold the edge or gutter with both hands above your head. Lie back, ears in, and let your body float up. The wall does the balancing so you can just get used to the feeling of water under your head.
- Partner support. Your partner stands behind your head with one hand under the back of your head and the other under your lower back. Over several attempts, they reduce the support to fingertips and then take their hands away while staying right there. Agree beforehand that they’ll always tell you before they let go.
- Pool noodle under the arms. Lay a noodle behind your shoulders and hook it under both armpits, then lie back into the star position. Later, move it down under your lower back to help sinking hips, then take it away.
- Kickboard as a pillow. Rest the back of your head on a kickboard while you work on lifting your tummy and spreading your legs. It keeps your face high while the rest of you finds its position.
- Pull buoy between the thighs. If your legs are the stubborn part, a pull buoy (the figure-of-eight foam float) squeezed lightly between your thighs lifts them so you can feel what a level float is like. Use it for a few sessions, then go without.
Back float positions to try
The starfish is the easiest place to start, but it isn’t the only way to float on your back. Once you’re comfortable, try these and notice how each one changes your balance.
| Position | How to do it | Best for |
| Starfish float | Arms out at shoulder height, legs apart | Beginners; the most stable shape |
| Arms-overhead float | Arms extended above your head beside your ears, legs apart or together | Swimmers whose legs sink; shifts weight towards the head |
| T float | Arms straight out to the sides, legs together | A step towards a narrower, more controlled float |
| Pencil float | Arms by your sides, legs together | Testing balance; the hardest still float |
| Sculling float | Arms by your hips, hands sculling gently | Lean or muscular bodies; staying up for a long time |
A good drill is to move slowly from the starfish into the pencil float and back again. You’ll feel exactly how much the wider shape helps, and you’ll learn to make the small adjustments that keep you level.
Why your legs sink when you float on your back
Your legs sink first because they’re mostly muscle and bone, while your chest is full of air. The body acts like a seesaw, with the lungs as the high end and the legs as the low end. That’s true for almost everyone, so if it’s happening to you, nothing is wrong.
How much they sink depends on a few things:
- Body composition. Fat floats more easily than muscle. Lean, athletic adults, and many men and teenage boys, float lower than people with more body fat.
- Age. Young children usually float more easily than adults, partly because their legs are lighter relative to their chests.
- Head position. Lifting your head even slightly adds weight above the water and drops your hips and legs.
- Breath. Less air in your lungs means less lift at the top of the seesaw.
- Tension. A stiff, braced body sits lower than a relaxed one.
It also helps to know that a good back float doesn’t have to be perfectly flat. Plenty of adults float at an angle, with their chest and face at the surface and their legs hanging lower. If your face is clear and you’re breathing comfortably without struggling, you’re floating. The flat starfish in the pictures is something to work towards, not a test you’ve failed.
Common back float mistakes and how to fix them
| Mistake | What happens | The fix |
| Lifting your head to look at your feet | Hips drop, body folds, you sink | Ears fully in, eyes fixed on one spot above you |
| Ears out of the water | Head weight pushes legs down | Lay your head back further, like resting on a pillow |
| Bending at the hips | Bottom sinks into a sitting position | Push your belly button up; squeeze your glutes lightly |
| Holding your breath, then letting it all out | Body drops sharply on the big exhale | Small breaths out, quick top-ups |
| Pushing off the floor hard | You shoot backwards and tense up | Lean back slowly and let your feet drift up |
| Arms and legs tucked in | Small, unstable shape that tips over | Spread into a wide starfish |
| Rolling to one side | Usually uneven arms or a turned head | Spread both arms evenly; keep your face centred |
| Panicking after a few seconds | You don’t yet trust the recovery | Practise standing up ten times before each float |
A four-week plan to learn to float on your back
Short, regular sessions work better than long, occasional ones. Aim for two or three practices of 15 to 20 minutes a week. Move to the next week only when the current one feels easy, even if that takes longer than seven days.
Week 1: Get comfortable lying back
- Practise the lean back from a low position with your hands on the wall.
- Get used to having your ears in the water for 5 to 10 seconds at a time.
- Do ten stand-up recoveries every session, using both methods.
Week 2: Supported floats
- Float with a partner’s hands under your head and lower back.
- Try the noodle under the arms, then under the lower back.
- Work on the breathing rhythm while supported, until it feels natural.
Week 3: Your first unsupported floats
- Float on your own in the starfish position for 5, then 10, then 20 seconds.
- Add sculling or a gentle kick if your legs sink.
- Start each float from a push and glide: feet on the wall, lean back, push off gently with arms overhead and let the glide settle into a float.
Week 4: Longer, calmer floats
- Work up to 30 and then 60 seconds of relaxed floating.
- Move between the starfish and pencil positions.
- Practise standing up in the middle of a float without warning yourself first, so the recovery becomes instinctive.
By the end of the month, most people can float comfortably for 30 seconds or more. If you’re still struggling, that’s usually a sign that fear or tension is the real issue rather than technique, and a few sessions with a coach in the water beside you tend to make the biggest difference.
How to teach a child to float on their back
Children often float more easily than adults, but lying back can be unsettling for them because they can’t see what’s going on behind their heads. Your job is mostly to build trust, then to step back gradually.
Babies (around 4 to 12 months)
Hold your baby so the back of their head rests on your shoulder, with their body lying along the water, and walk slowly backwards so they feel it moving under them. When they’re relaxed there, cup the back of their head in one hand and support their bottom with the other. Keep your face close to theirs and sing or talk constantly. Warm water makes a big difference at this age, because a cold baby tenses up and won’t settle.
Toddlers (1 to 3 years)
Toddlers want to see you. Support the back of their head in your hand with their body along your forearm, and keep eye contact. Short goes of a few seconds are plenty; finish each one before they start to wriggle. If they cry or arch away, go back to something they enjoyed and try again another day. This slow, parent-in-the-water approach is exactly how baby and toddler swimming classes build water confidence at this age.
Preschoolers (3 to 4 years)
This is the age where games do the teaching. Ask them to “be a starfish”, “go to sleep on the water” or “find the lights on the ceiling”. Count together, and see if they can beat yesterday’s number. Let them hold a noodle or kickboard on their tummy at first, then take it away.
School-age children (5 years and up)
Older children can follow the eight adult steps, work on timed floats and practise standing up on their own. This matters in Singapore because the national SwimSafer 2.0 programme, which many children meet through school, includes a 10-second back float followed by recovering to standing at Stage 2. If your child is getting ready for it, learn to swim classes for kids cover the back float alongside the main strokes and survival skills.
Rules that apply at every age
- Tell your child what you’re about to do before your hands move. Surprises break trust quickly.
- Never let go without saying so, even when they’re doing brilliantly.
- Keep sessions short and end on a good attempt, so they leave the pool wanting more.
- Don’t use armbands or inflatables to teach floating. They keep children upright and can give both of you a false sense of security.
- Stay within arm’s reach, even once they can float. Floating gives a child time, but it doesn’t make them water-safe.
That last point is worth taking seriously. KK Women’s and Children’s Hospital recorded 361 child drowning cases in Singapore between 2012 and 2023. 86% involved children aged seven or under, and 83% happened in swimming pools. In private pools such as condos and hotels, only 2% of the children were found by a lifeguard, while 61% were found by family members, according to the KKH Child Injury Surveillance Report 2024. Many condo pools have no lifeguard at all, so the adult watching is the safety net. If a helper takes your children to the pool, make sure they know these rules too and can supervise without distractions.
How to float on your back as an adult beginner
If you never learned as a child, you’re in very good company, and it’s not too late. Adults do tend to find floating harder than children, for two reasons: heavier legs, and more fear. Both are manageable.
Start with the stand-up recovery before anything else, because knowing you can get out of the float on your own is what lets you relax into it. Expect to float a bit lower than you’d like at first, and use the arms-overhead position or a gentle scull to help. Choose a quiet, heated pool where you won’t be splashed by lap swimmers or cold enough to tense up.
If you’re very anxious around water, or had a frightening experience in the past, having a coach in the water with you makes a real difference. They can support you exactly where you need it and go at your pace. At AquaDucks our adult swimming classes take complete beginners as well as people returning after years out of the water, and private one-to-one lessons are there if you’d rather start without a group.
Floating is also wonderful for older adults. It takes the weight off sore joints and is one of the most relaxing things you can do in a pool.
From back float to backstroke
A steady back float is the foundation for every stroke on your back. Once you can float for 30 seconds or more, try these next steps in order:
- Kicking on your back. From a back float, add a steady flutter kick from the hips with soft knees and pointed toes, and let it carry you slowly across the pool.
- Elementary backstroke. Bring your hands up along your sides to your armpits, push them out and back down to your thighs, and pair it with a gentle frog kick. It’s slow, relaxing and a great survival stroke.
- Backstroke. Add alternating straight-arm pulls over your head to the kick, keeping your head still and your hips high, exactly as in the float.
Take these one at a time. Each one keeps the same body position as the float, so if a stroke starts to feel wobbly, go back to floating for a few lengths and then try again.
How to float on your back in the sea or in an emergency
You’ll float a little higher in the sea at Sentosa, East Coast Park or Changi, because seawater is denser than pool water. But open water is harder to relax in. Waves splash your face, currents and tides move you around, and wakes from passing boats can catch you off guard. Salt water up the nose also stings far more than pool water. Learn the back float in a pool first, and when you try it in the sea, stay in shallow water near the shore, swim only where swimming is allowed and go with someone.
The back float is also the single most useful thing to do if you ever get into trouble in the water. The UK’s Royal National Lifeboat Institution (RNLI) built its Float to Live campaign around it, based on research from the University of Portsmouth. If you find yourself struggling:
- Fight the instinct to thrash about or swim hard.
- Lean back, put your ears in the water and spread your arms and legs.
- Breathe slowly until your breathing is under control.
- Then wave and shout for help, or swim slowly towards safety.
Singapore’s water is warm, so the cold-water shock the RNLI campaign was first designed for is less of a risk here. The panic, though, with its fast breathing and frantic splashing, is the same in any water, and floating is what calms it down. Researchers at Portsmouth found that following the Float to Live advice significantly improved how well inexperienced people could float in lakes and seas, not just in pools (University of Portsmouth).
Frequently asked questions
Why can’t I float on my back?
The most common reasons are lifting your head, keeping your ears out of the water, breathing out too much and holding your body stiff. Put your ears in, look straight up, spread into a starfish, keep your lungs mostly full and relax. If you’re lean or muscular, add a gentle scull or kick.
Can everyone float on their back?
Nearly everyone can float with full lungs and the right position, though not everyone will float perfectly flat. Some people float at an angle with their legs lower, or need small hand movements to stay up. All of that counts as floating.
Why do my legs sink when I float on my back?
Your legs are denser than your chest, which is full of air, so they naturally drop first. Putting your ears fully in the water, moving your arms above your head and lifting your tummy all help. A pull buoy between the thighs is a good training aid.
Should I hold my breath when floating on my back?
Not completely. Take a full breath, then breathe out in small amounts and top up before your lungs empty. Holding your breath until you’re desperate adds tension, and one big exhale will make you sink.
How do I stop water going up my nose when back floating?
Hum gently through your nose, avoid sudden head movements and lean back slowly from a low position. A nose clip is a perfectly good aid while you learn.
How long does it take to learn to float on your back?
Some beginners manage a short float in their first session. Most people who practise two or three times a week can float comfortably for 30 seconds within about a month. Very anxious adults may need longer, and that’s normal.
What age can a child learn to float on their back?
Babies can get used to lying back with full support from a parent in their first year. Most children can float independently somewhere between three and six, depending on confidence and how often they’re in the water.
Is it easier to float on your back in salt water?
Yes, slightly, because seawater is denser than fresh water. Salt-chlorinated pools contain far less salt than the sea, so they feel much the same as a regular pool.
Is floating on your back the same as treading water?
No. Floating means lying on the surface with as little effort as possible. Treading water means staying upright in deep water by moving your arms and legs. Both are important survival skills, and floating is usually taught first.
Learn to float on your back with an AquaDucks coach
Reading the steps helps, but most people find their float faster with a coach in the water beside them, someone who can put a hand under your head at the right moment and tell you exactly what your hips are doing. AquaDucks teaches babies, children, adults and seniors in indoor, heated, salt-chlorinated pools across Singapore, including Queenstown, Pasir Panjang, Mountbatten and Upper Bukit Timah.
Book a trial lesson or WhatsApp us on (+65) 8080 1834, and we’ll help you or your little one find that first relaxed float.
Swim Smart. Swim Safe. Swim Happy.